Arduino - 超聲波感測器
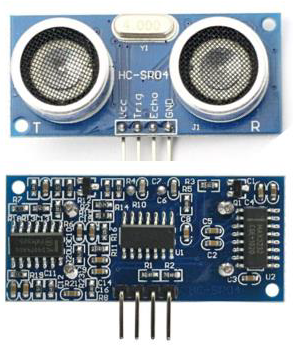
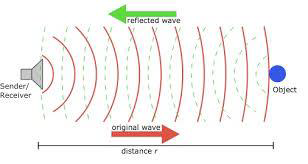
HC-SR04 超聲波感測器使用超聲來確定物體的距離,就像蝙蝠一樣。它提供出色的非接觸式範圍檢測,具有高精度和穩定的讀數,易於使用的包裝,它的測量距離從 2 釐米到 400 釐米或 1 英寸到 13 英尺。
超聲波的工作不受陽光或黑色材料的影響,雖然聲學上很難檢測到布料之類的柔軟材料。它配有超聲波發射器和接收器模組。
技術規格
- 電源 - +5V DC
- 靜態電流 - <2mA
- 工作電流 - 15mA
- 有效角度 - <15°
- 測距距離 - 2 釐米 - 400 釐米/ 1 英寸 - 13 英尺
- 解析度 - 0.3 釐米
- 測量角度 - 30 度
需要的元件
你將需要以下元件 -
- 1×麵包板
- 1×Arduino Uno R3
- 1×超聲波感測器(HC-SR04)
程式
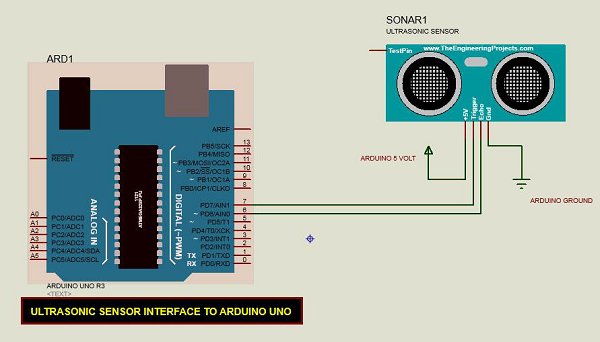
按照電路圖進行連線,如下圖所示。
草圖
在你的計算機上開啟 Arduino IDE 軟體。用 Arduino 語言編碼將控制你的電路。單擊“新建”開啟新的草圖檔案。

Arduino 程式碼
const int pingPin = 7; // Trigger Pin of Ultrasonic Sensor
const int echoPin = 6; // Echo Pin of Ultrasonic Sensor

void setup() {
   Serial.begin(9600); // Starting Serial Terminal
}

void loop() {
   long duration, inches, cm;
   pinMode(pingPin, OUTPUT);
   digitalWrite(pingPin, LOW);
   delayMicroseconds(2);
   digitalWrite(pingPin, HIGH);
   delayMicroseconds(10);
   digitalWrite(pingPin, LOW);
   pinMode(echoPin, INPUT);
   duration = pulseIn(echoPin, HIGH);
   inches = microsecondsToInches(duration);
   cm = microsecondsToCentimeters(duration);
   Serial.print(inches);
   Serial.print("in, ");
   Serial.print(cm);
   Serial.print("cm");
   Serial.println();
   delay(100);
}

long microsecondsToInches(long microseconds) {
   return microseconds / 74 / 2;
}

long microsecondsToCentimeters(long microseconds) {
   return microseconds / 29 / 2;
}
程式碼注意
超聲波感測器有四個端子 - +5V,Trigger,Echo 和 GND 連線如下 -
- 將+5V 引腳連線到 Arduino 板上的+5v。
- 將觸發器連線到 Arduino 板上的數字引腳 7。
- 將 Echo 連線到 Arduino 板上的數字引腳 6。
- 將 GND 與 Arduino 上的 GND 相連。
在我們的程式中,我們通過串列埠顯示感測器測量的距離,單位為英寸和釐米。
結果
你將在 Arduino 序列監視器上看到感測器測量的距離,單位為英寸和釐米。