Arduino - 鍵盤訊息
在此示例中,按下按鈕時,文字字串將作為鍵盤輸入傳送到計算機。該字串報告按下按鈕的次數。一旦你對 Leonardo 進行了程式設計和接線,開啟你喜歡的文字編輯器來檢視結果。
警告 - 使用 Keyboard.print() 命令時,Arduino 將接管計算機的鍵盤。為確保在使用此功能執行草圖時不會失去對計算機的控制,請在呼叫 Keyboard.print() 之前設定可靠的控制系統。該草圖包括一個用於切換鍵盤的按鈕,因此它僅在按下按鈕後才會執行。
需要的元件
你將需要以下元件 -
- 1×麵包板
- 1×Arduino Leonardo,Micro 或 Due board
- 1×瞬時按鈕
- 1×10k 歐姆電阻器
程式
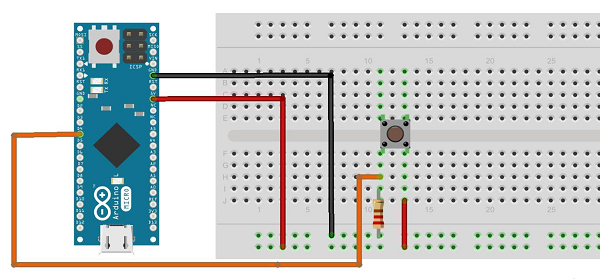
按照電路圖並連線面包板上的元件,如下圖所示。
草圖
在你的計算機上開啟 Arduino IDE 軟體。用 Arduino 語言編碼將控制你的電路。單擊“新建”開啟新的草圖檔案。

Arduino 程式碼
/*
   Keyboard Message test For the Arduino Leonardo and Micro,
      Sends a text string when a button is pressed.
   The circuit:
   * pushbutton attached from pin 4 to +5V
   * 10-kilohm resistor attached from pin 4 to ground
*/

#include "Keyboard.h"
const int buttonPin = 4; // input pin for pushbutton
int previousButtonState = HIGH; // for checking the state of a pushButton
int counter = 0; // button push counter

void setup() {
   pinMode(buttonPin, INPUT); // make the pushButton pin an input:
   Keyboard.begin(); // initialize control over the keyboard:
}

void loop() {
   int buttonState = digitalRead(buttonPin); // read the pushbutton:
   if ((buttonState != previousButtonState)&& (buttonState == HIGH)) // and it's currently pressed: {
      // increment the button counter
      counter++;
      // type out a message
      Keyboard.print("You pressed the button ");
      Keyboard.print(counter);
      Keyboard.println(" times.");
   }
   // save the current button state for comparison next time:
   previousButtonState = buttonState;
}
程式碼注意
將按鈕的一個端子連線到 Arduino 上的引腳 4。將另一個引腳連線到 5V。使用電阻作為下拉電阻,通過將引腳 4 連線到地,提供接地參考。
完成電路板程式設計後,拔下 USB 電纜,開啟文字編輯器,將文字游標放在打字區域。再次通過 USB 將主機板連線到計算機,然後按按鈕在文件中寫入。
結果
通過使用任何文字編輯器,它將顯示通過 Arduino 傳送的文字。