CherryPy - 一個工作應用程式
完整堆疊應用程式提供了通過某些命令或檔案執行來建立新應用程式的工具。
考慮像 web2py 框架這樣的 Python 應用程式; 整個專案/應用程式是根據 MVC 框架建立的。同樣,CherryPy 允許使用者根據需要設定和配置程式碼的佈局。
在本章中,我們將詳細瞭解如何建立 CherryPy 應用程式並執行它。
檔案系統
該應用程式的檔案系統顯示在以下螢幕截圖中 -
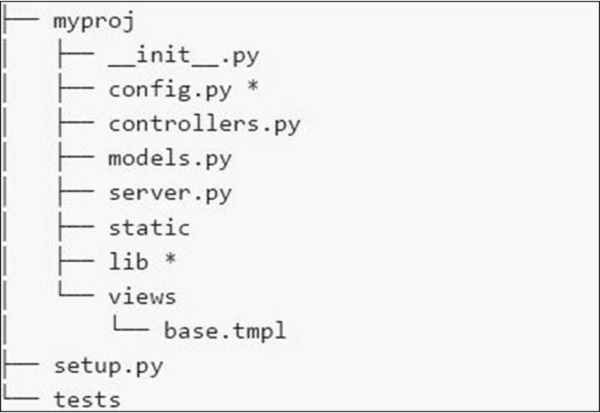
以下是我們在檔案系統中擁有的各種檔案的簡要說明 -
-
config.py- 每個應用程式都需要配置檔案和載入它的方法。可以在 config.py 中定義此功能。 -
controllers.py- MVC 是使用者遵循的流行設計模式。controllers.py 是實現將安裝在 cherrypy.tree 上的所有物件的地方。 -
models.py- 此檔案直接與資料庫互動以獲取某些服務或儲存持久資料。 -
server.py- 此檔案與生產就緒的 Web 伺服器互動,該伺服器可與負載平衡代理正常工作。 -
static- 它包含所有 CSS 和影象檔案。 -
views- 它包含給定應用程式的所有模板檔案。
例
讓我們詳細瞭解建立 CherryPy 應用程式的步驟。
步驟 1 - 建立應包含應用程式的應用程式。
步驟 2 - 在目錄中,建立一個與專案對應的 python 包。建立 gedit 目錄並在其中包含_init_.py 檔案。
步驟 3 - 在包內,包含具有以下內容的 controllers.py 檔案 -
#!/usr/bin/env python

import cherrypy

class Root(object):

   def __init__(self, data):
      self.data = data

   @cherrypy.expose
   def index(self):
      return 'Hi! Welcome to your application'

def main(filename):
   data = {} # will be replaced with proper functionality later

   # configuration file
   cherrypy.config.update({
      'tools.encode.on': True, 'tools.encode.encoding': 'utf-8',
      'tools.decode.on': True,
      'tools.trailing_slash.on': True,
      'tools.staticdir.root': os.path.abspath(os.path.dirname(__file__)),
   })

   cherrypy.quickstart(Root(data), '/', {
      '/media': {
         'tools.staticdir.on': True,
         'tools.staticdir.dir': 'static'
      }
   })

if __name__ == '__main__':
main(sys.argv[1])
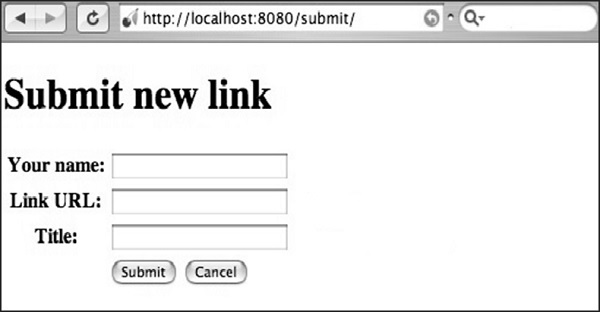
步驟 4 - 考慮使用者通過表單輸入值的應用程式。我們在應用程式中包含兩個表單 - index.html 和 submit.html。
步驟 5 - 在上面的控制器程式碼中,我們有 index() ,這是一個預設函式,如果呼叫特定的控制器,則首先載入。
步驟 6 - index() 方法的實現可以通過以下方式更改 -
@cherrypy.expose
   def index(self):
      tmpl = loader.load('index.html')

      return tmpl.generate(title='Sample').render('html', doctype='html')
步驟 7 - 這將在啟動給定應用程式時載入 index.html 並將其指向給定的輸出流。index.html 檔案如下 -
index.html
<!DOCTYPE html >
<html>
   <head>
      <title>Sample</title>
   </head>

   <body class = "index">
      <div id = "header">
         <h1>Sample Application</h1>
      </div>

      <p>Welcome!</p>

      <div id = "footer">
         <hr>
      </div>

   </body>

</html>
步驟 8 - 如果要建立一個接受名稱和標題等值的表單,則必須在 controller.py 中的 Root 類中新增一個方法。
@cherrypy.expose
   def submit(self, cancel = False, **value):

      if cherrypy.request.method == 'POST':
         if cancel:
            raise cherrypy.HTTPRedirect('/') # to cancel the action
         link = Link(**value)
         self.data[link.id] = link
         raise cherrypy.HTTPRedirect('/')
      tmp = loader.load('submit.html')
      streamValue = tmp.generate()

      return streamValue.render('html', doctype='html')
步驟 9 - submit.html 中包含的程式碼如下 -
<!DOCTYPE html>
   <head>
      <title>Input the new link</title>
   </head>

   <body class = "submit">
      <div id = " header">
         <h1>Submit new link</h1>
      </div>

      <form action = "" method = "post">
         <table summary = "">
            <tr>
               <th><label for = " username">Your name:</label></th>
               <td><input type = " text" id = " username" name = " username" /></td>
            </tr>

            <tr>
               <th><label for = " url">Link URL:</label></th>
               <td><input type = " text" id=" url" name= " url" /></td>
            </tr>

            <tr>
               <th><label for = " title">Title:</label></th>
               <td><input type = " text" name = " title" /></td>
            </tr>

            <tr>
               <td></td>
               <td>
                  <input type = " submit" value = " Submit" />
                  <input type = " submit" name = " cancel" value = "Cancel" />
               </td>
            </tr>

         </table>

      </form>
      <div id = "footer">
      </div>

   </body>

</html>
步驟 10 - 你將收到以下輸出 -
這裡,方法名稱定義為 POST 。交叉驗證檔案中指定的方法始終很重要。如果方法包含 POST 方法,則應在適當的欄位中在資料庫中重新檢查這些值。
如果方法包含 GET 方法,則要儲存的值將在 URL 中可見。